
We have covered PfSense installation in different hypervisors in the past. When someone tells you about virtualizing PfSense in a bigger network, the first thing that comes to your mind is the VMware ESXi, which is the type1 of hypervisor built only for running Virtual machines.
In this blog, we will look at how you can install PfSense on an ESXi hypervisor. After the installation, we will spin up some clients on the LAN side, test connectivity to the internet, and check which path it is taking to get there.
Does PfSense work well with ESXi?
In one of the POC labs, we have used the PfSense firewall in the ESXi host, and we didn’t find any issues at any point except once we had a problem with VM’s were unable to connect to the internet. we couldn’t really find any issues with the configuration, and neither any changes that were performed on the firewall at that point. After doing so much research and troubleshooting we were about to give up, we decided to reboot the PfSense firewall. After the reboot, the issue got fixed by itself. It sounds weird but that worked at that time. Even though PfSense is a good product, it is not entirely bug-free. So you need to be mindful of that. Even the big solid commercial firewall works well on the physical box, acts weird when it comes to virtualization.
Below is the topology that we are going to use.
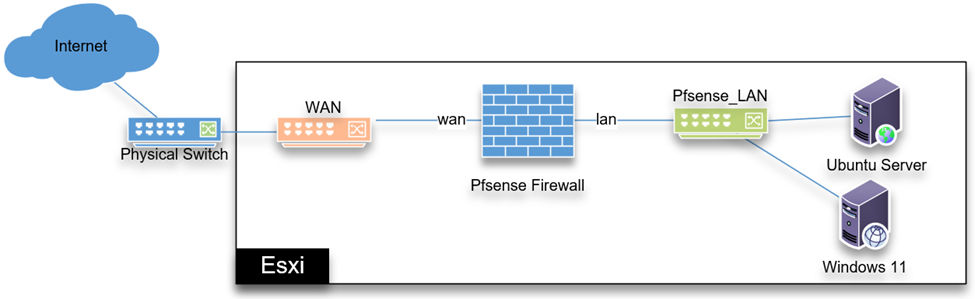

We will be using a single ESXi host in this lab connected to a physical switch connected to the internet.
- In Esxi host, I have a single standard switch vSwitch0 at the moment that carries the ESXi management traffic.
- We will configure another virtual switch called WAN with an uplink connected to the internet and a second link connected to the PfSense WAN interface.
- We will also create another virtual switch called PfSense_LAN without any uplink which will be shared by the VM’s and the PfSense LAN interface.
- After the deployment of PfSense, we would connect those clients to PfSense_LAN_SW and test the connectivity.
Before you begin, you need to have;
- A machine with ESXi installed.
- PfSense ISO image- Click here to download.
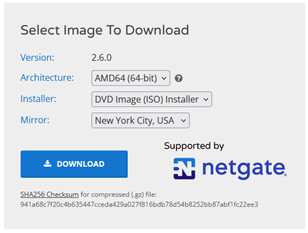
We are using version 2.6.0 community edition in this lab. When downloading the file, you need to ensure that you choose the Architecture: AMD64, Installer: DVD Image(ISO) Installer.

Steps to install PfSense firewall on VMware ESXi hypervisor.
Create a Virtual switch for PfSense LAN in WAN.
The ESXi host I have installed in my lab is a brand new installation, so it has a default vSwtich0, I am using that switch only for the ESXi management access. We will create two virtual switches for the PfSense configuration, PfSense_LAN, and WAN.
Log in to the ESXi Host,
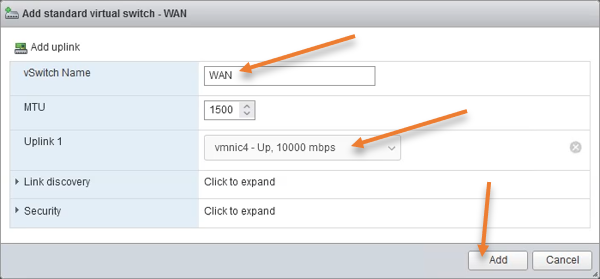
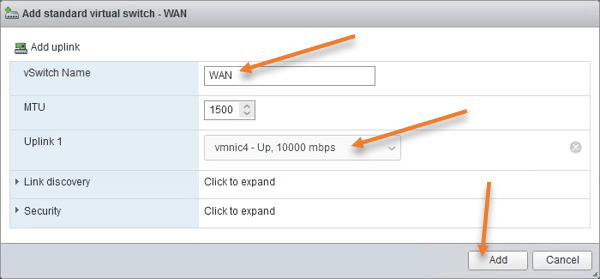
Goto Networking-> Virtual Switches-> Add Standard virtual Switch.
Setup the LAN switch.
We are going to create the LAN switch first.
Name the virtual switch: PfSense_LAN.
Remove the uplink.


Configure the WAN switch.
Click on Add standard virtual switch again.
Name: WAN.
Uplink1: Choose the uplink that goes to the internet service provider or the link where you have internet access.
Click on Add.
Port group for PfSense LAN and WAN.
We have configured the virtual switch for PfSense to connect. We need to create a port group to connect PfSense to its respective ports.
Networking-> Port Groups->Add port group.
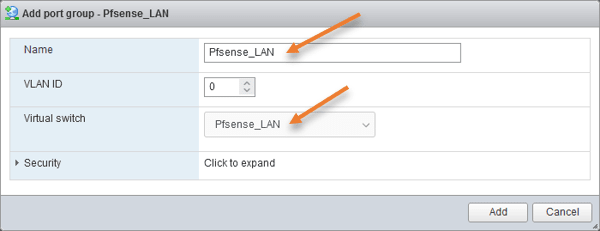
Port group for LAN.
Name: PfSense_LAN.
Virtual switch: by default, your ESXi host would select vSwitch0. You need to ensure that you choose the PfSense_LAN switch instead and click on Add.

Port group for WAN.
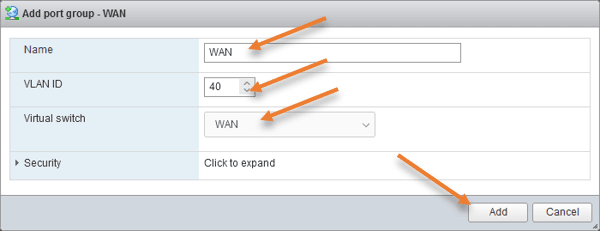
Follow the same steps again for the WAN port group.
Name: WAN.
VLAN ID: 40
Virtual Switch: You need to choose the WAN virtual switch we created earlier.
Click on Add.
Note: Here I am tagging my WAN port group with VLAN 40 because that’s what I am using on my physical switch to connect to the internet. so if your physical switch and the ESXi are configured with trunk and you have configured VLAN to separate the internet traffic, you may use the tagging here. Else not required.

Create the PfSense Virtual machine.
We have completed the Network side of the configuration in ESXi. Let’s go ahead and create a PfSense firewall virtual machine now.
Virtual machines-> Create/Register VM
The VM creation wizard will now pop up.
Select Create a new virtual machine and click on Next.


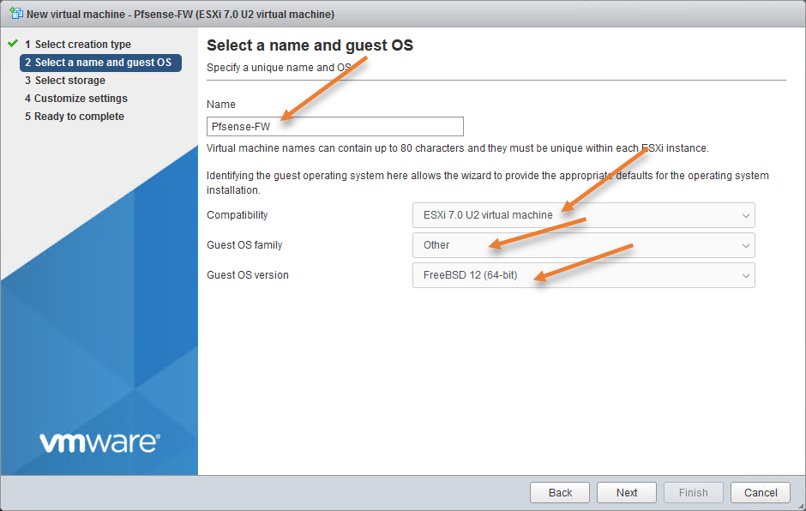
Select the name and guest OS.
We will install PfSense 2.6 in ESXi, which is based on FreeBSD 12.3. Hence we will need to choose FreeBSD 12 on the Guest OS version
In the Pop-up.
Name: PfSense-FW.
Compatibility: ESXi 7.0 U2 virtual machine.
Guest OS Family: Other.
Guest OS version: FreeBSD 12(64bit)
Note: You might be using an older version of ESXi, so you must choose your version as Compatibility, and in the Guest OS version, if you don’t see freeBSD12, you may select FreeBSD 11 or lower.
Do not choose FreeBSD 13. The installation will not proceed if you do so.
After the selection, click on Next.

On the next screen, Chose your datastore and click on Next.
Configure the PfSense VM resources.
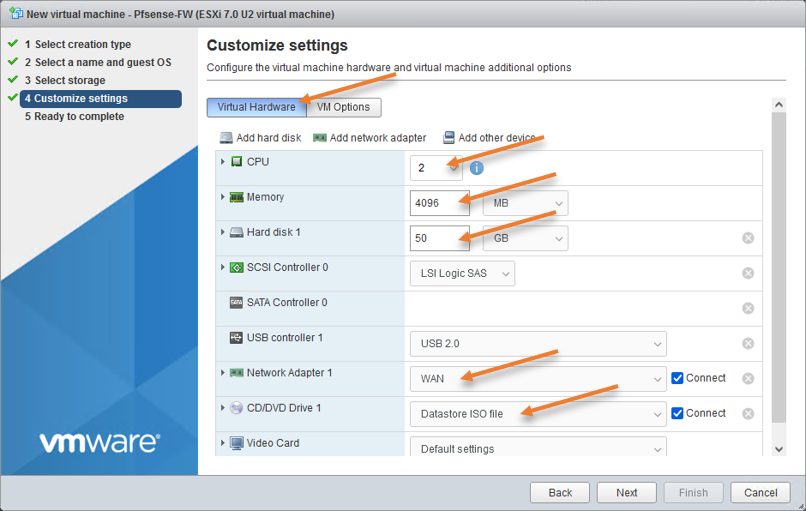
You are now taken to the ESXi customize settings for the PfSense virtual machine. We will have to make some changes here.
CPU: 2
The PfSense should work fine with a single CPU; however, it is best to keep 2 CPUs at least.
Memory: 2048 – I have run PfSense with 1Gig of ram in the past with no issues; however, if you have enough RAM, provide 2GB else, you may stick with 1GB itself.
Hard disk: 50 – You can leave the default 8GB of storage. If you plan to collect logs on the PfSense itself, you will have to have more storage hence I chose 50GB. It is recommended to send the logs to a Syslog server instead of using the PfSense box.
Network Adapter1: WAN – The first adapter on the PfSense should connect to the WAN port group on the ESXi, hence choose that.
CD/DVD Drive 1 – I have already uploaded the PfSense iso files to my ESXi datastore, I will have to point my virtual CD Drive to use that location.
In the drop-down, choose the Datastore ISO file. Choose the PfSense ISO file that we have uploaded.
Do not click on Next yet.

Attach the secondary adapter.
We have only attached the WAN interface of the PfSense firewall. Let’s go ahead and add the secondary adapter, which we can use for the PfSense LAN side.
In the customize settings screen, click on Add network adapter.
Choose PfSense_LAN on the newly added adapter.


After that, click on Next.
You will get a summary of the virtual machine. Click on the finish here.
Install the PfSense on ESXi.
We have just added the PfSense firewall in ESXi. Let’s go ahead and initiate the PfSense installation on ESXi.
Double click on the PfSense VM that we just installed.
After a few seconds, the PfSense will boot and proceed with the installation.
- Accept the License Agreement.
- Choose Install.
- Keymap selection – Continue with the default Keymap
In case if you would like to make changes to the keymap, you may do so here. - Choose Auto (ZFS)
- Install.
- Stripe- we are not providing any redundancy for the storage, hence choosing Stripe. If you would like to choose a different option, you can do that here.
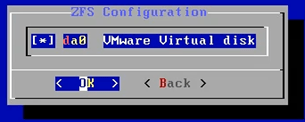
- Choose the disk da0 using the space bar and hit Ok.

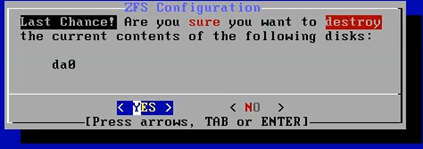
- You will be asked whether you want to format the virtual hard disk or not, you may choose yes here.

- After a few moments, the PfSense firewall installation completes.
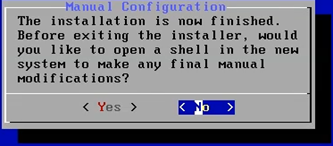
- In the manual configuration prompt, say No.
We will not make any changes on the PfSense using SHELL in this installation. If you are planning to make some changes, you may click on yes otherwise.

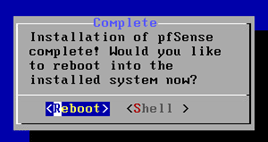
- After the installation, you may go ahead and reboot the PfSense firewall.

Configure the WAN and LAN interface.
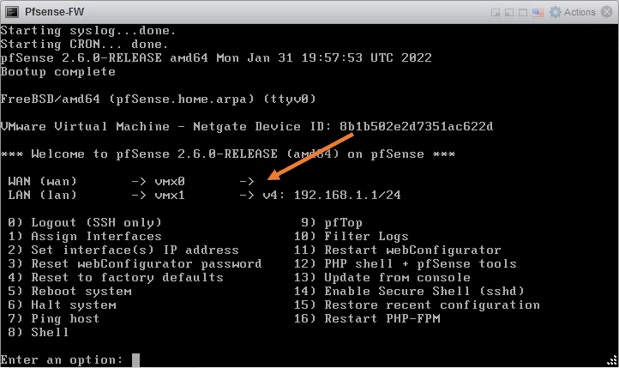
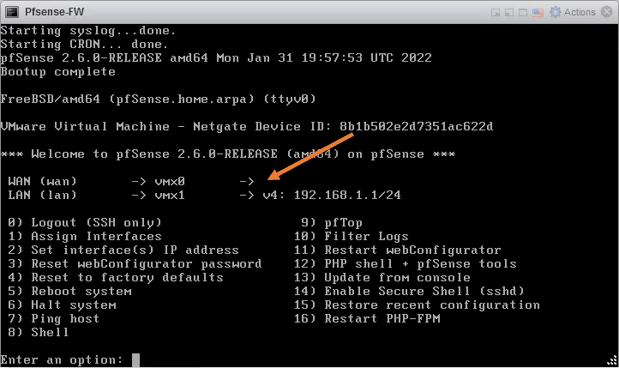
When the PfSense load for the first time, you will see two interfaces have come up under the valid interfaces list.
It will ask you whether you want to create a VLAN or not. Since we already have two different networks, we don’t require VLAN at this moment, hence say no.
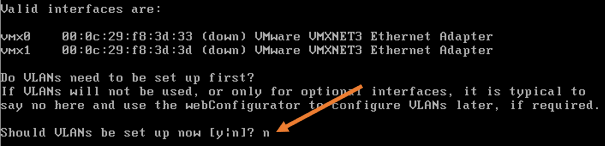
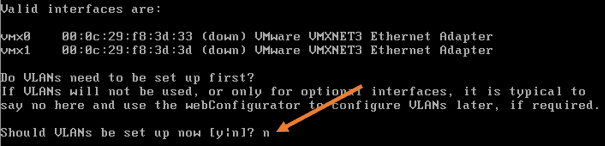
If you plan to use VLAN within PfSense, I have covered how you can create and manage different networks using PfSense VLAN here.
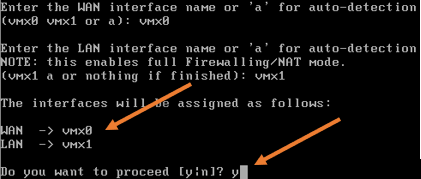
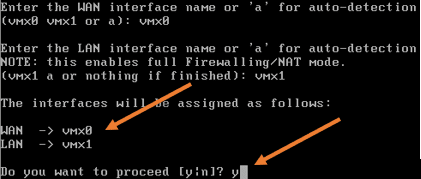
Next, you will be required to define the WAN and the Lan interfaces of the PfSense firewall. For the WAN interface, we will use vmx0 and the LAN vmx1; hence configure them accordingly.
After that, proceed with the configuration by typing Y.
If you have DHCP enabled on the WAN side of the firewall, you will see the WAN side configured with the DHCP IP and the LAN side configured with the default 192.168.1.0/24 subnet.
I don’t have DHCP enabled on the WAN side; hence I see only the LAN side with the IP configuration and WAN side is empty.
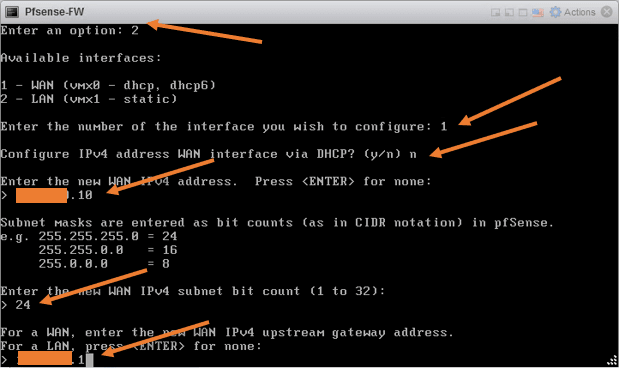
Let’s go ahead and configure the WAN side IP address manually by pressing number 2. If you already have a DHCP address, you may skip this option.
Maybe you are using a PPPoE connection from your ISP on the WAN side, and you are wondering how to configure PPPoE on the PfSense WAN side. You may check out the article here.
- Enter the number of the interface you wish to configure: type 1 which represents WAN link.
- Configure IPv4 address WAN interface via DHCP : no
- Enter the new WAN IPv4 address: Due to security reason I am masking my public IP, you can also use a private IP if the pfsense is behind a NAT device.
- Enter the WAN IPv4 subnet.
- Finally the gateway and hit enter.

After a few seconds, you will see that WAN and LAN are configured and ready to use.
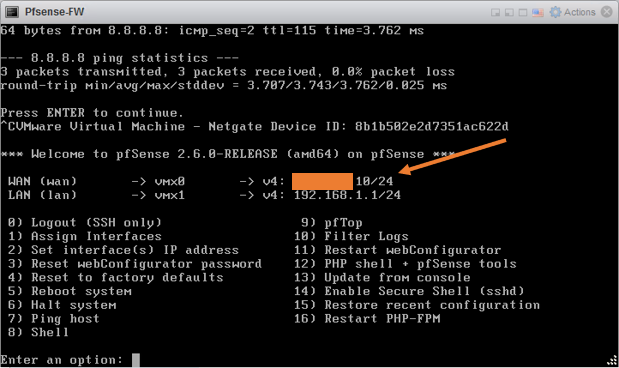

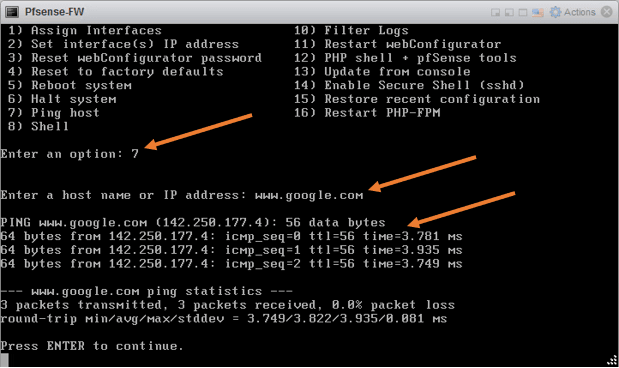
Test the internet access from the PfSense firewall.
If you have configured everything successfully so far, you will reach the internet just fine from PfSense.
To test internet access, From the PfSense firewall type 7, do a ping test to the internet. As you can see, I can reach the internet just fine.

Connect the virtual machine to the PfSense LAN side.
The whole idea of adding the firewall to the VMware ESXi is that any traffic from the virtual machines that goes out of my ESXi host (North-south traffic) should go via the PfSense firewall. And another cool part about PfSense is that it has DHCP enabled by default on the LAN side, and you don’t really need to configure any policies or NAT for the VM to go out. It is configured out of the box. So basically, once the internet link is up, it is just plug-and-play.
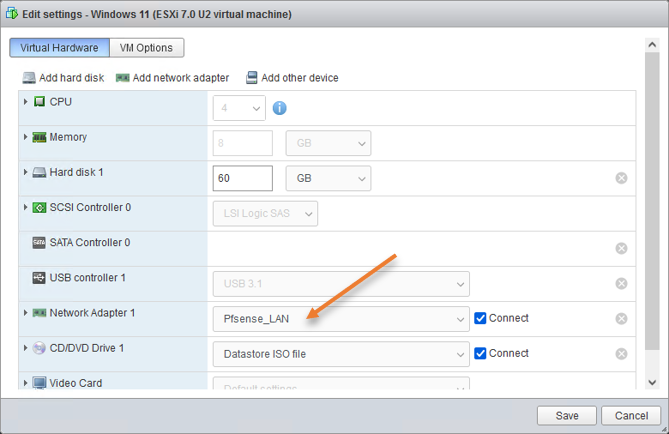
As per our diagram, we have two virtual machines, one is the Windows 11 machine, and another is the Ubuntu server, To connect these machines to the PfSense LAN side, you will have to connect them to the port group that we defined earlier, which is PfSense_LAN.
Virtual machines-> Select the VM-> Edit
Under virtual Hardware, in Network Adapter 1, choose PfSense_LAN

Verify the connectivity.
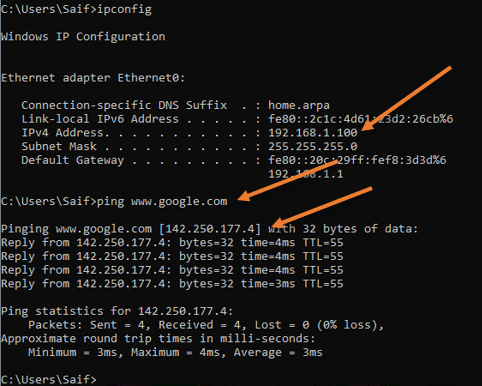
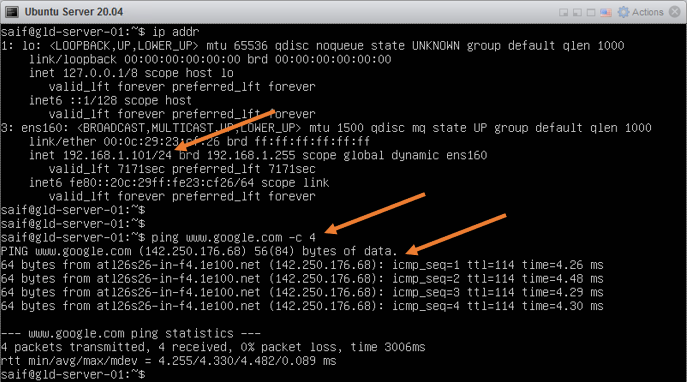
First, for the connection verification, you need to keep the VM in DHCP mode to get the IP address from the PfSense LAN side. Once the VM gets the IP address, and the pfsnese has a security policy and the NAT policy in place, all the VM’s connected to the LAN side should be able to go out.
Login to both the VM’s and check the IP address configuration.
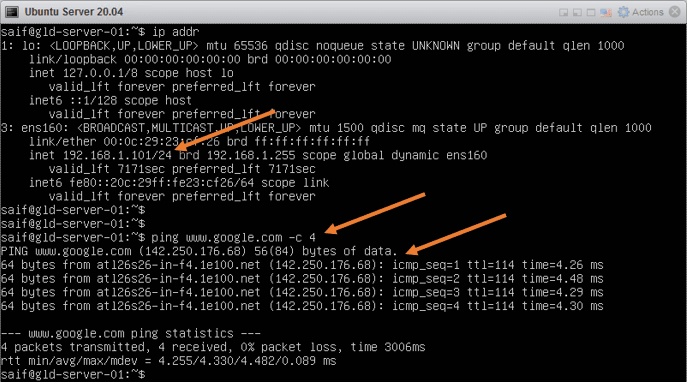
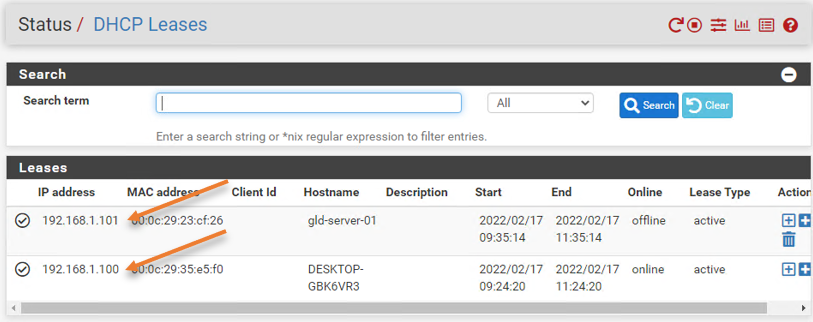
As you can see on the windows 11 machine, I got the IP address 192.168.1.100, and I can reach the internet as well.

It is the same case with the Ubuntu server, which got an IP address 192.168.1.101, the second one from the DHCP lease. it can reach the internet as well.
Finish the PfSense initial setup wizard.
Though everything is working, as we expected, you will need to finish the initial setup wizard for the PfSense VM.
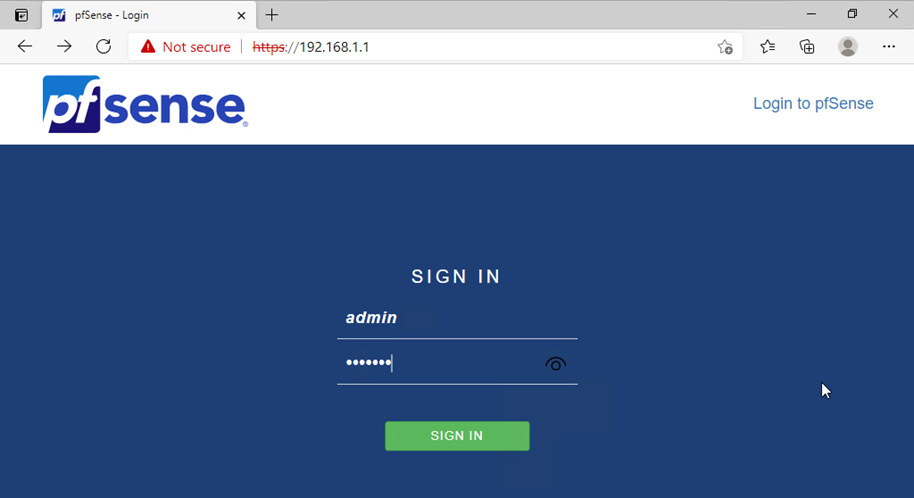
Open a web browser in any VM and type https://192.168.1.1, the LAN side IP address of PfSense.
Since I don’t have GUI installed on Ubuntu, I can access the GUI from the windows 11 box.
Ignore the security warning, and on the login prompt, enter the username as admin and the password as PfSense and click on Sign in.

You will be presented with the initial setup wizard. Click on next.
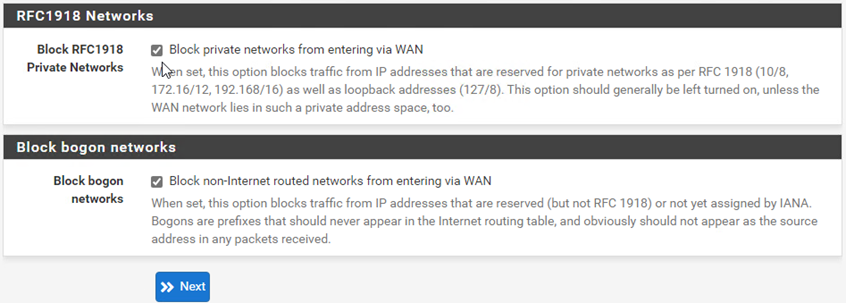
In case you would like to make any modifications, you may do so here. For example, if you are using a private IP address on the WAN side of the PfSense, you will have to uncheck the Block Private networks from entering via the WAN option on Step4.
I don’t have to uncheck this option as I am using the public IP address on the WAN side.

During the initial setup wizard, you should also change the default password to something else.
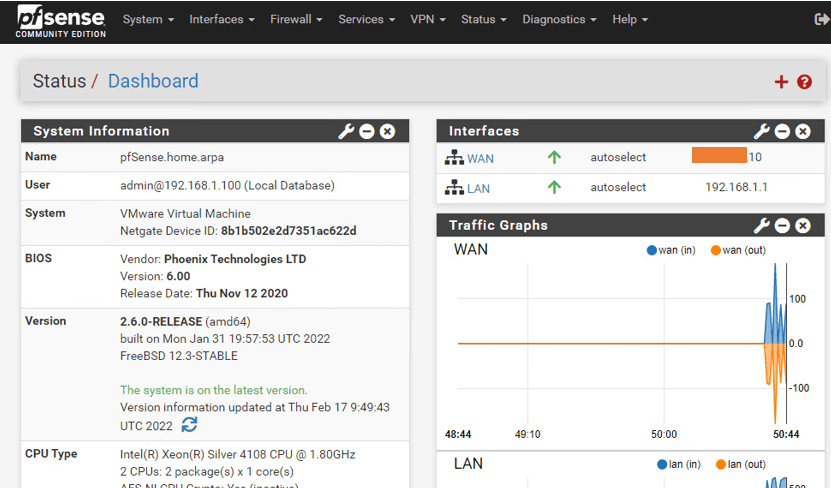
After you finish the initial setup wizard, you should be good to go.

Check the DHCP lease and traffic logs.
Remember you got an IP address automatically from the PfSense DHCP service to the VM’s, you can verify that by going into Status-> DHCP leases
As you can see, you have two IP addresses assigned to each VM.

Install the VMware tools.
Finally, to get better performance from the PfSense firewall virtual machine, it is recommended to install VMware tools.
Goto Systetem-> Package manager-> Available Packages
Search for vmware.
You will see Open-VM-Tools -> click on install-> Confirm.
After a few seconds, the package will be installed.
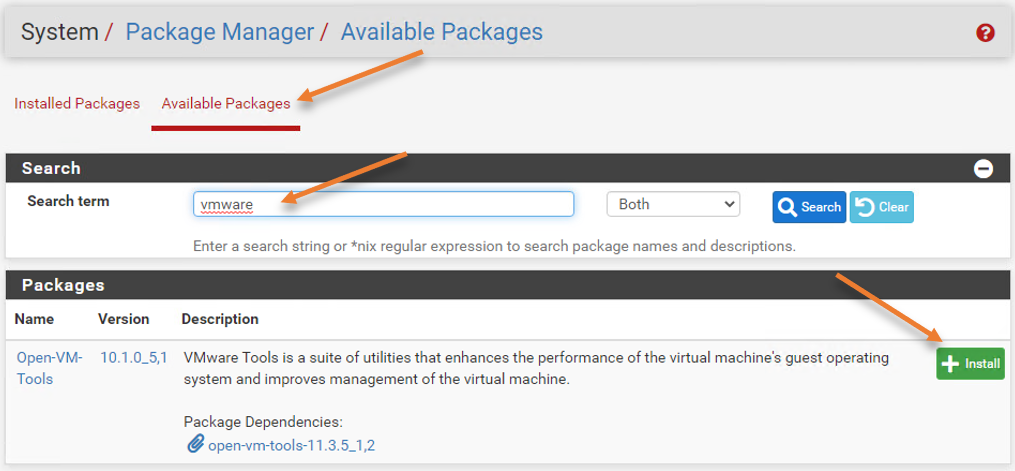
It is better to reboot the firewall post the installation.
Conclusion.
We have successfully installed the PfSense firewall on an ESXi box, and all the traffic that goes out will be via the PfSense firewall. If you are using this set up in your home network, you could further extend the LAN side of the network to the switch using VLAN and connect to your access point. That will be for another blog article.